Akash Shyam
Posted on March 5, 2021
Ever wondered how create-react-app . or git init or simply node -v works? These are CLIs or Command Line Interfaces. I'm pretty sure most of us have used CLIs at some point of time in our lives. Even commands that we use everyday like ls or cd are also CLIs.
Today, I'm going to show you how to set up a very simple CLI with some of the common features we find in CLIs. Nothing too complex... Let's dive right into CLIs
What are CLIs
CLIs are commands that we run in our terminal to do something. If you want a wikipedia definition 🙄 -
A command-line interface processes commands to a computer program in the form of lines of text. The program which handles the interface is called a command-line interpreter or command-line processor. Operating systems implement a command-line interface in a shell for interactive access to operating system functions or services.
Why are CLIs necessary?
In the modern world of GUIs(Graphical User Interfaces), you might ask that why should we know about CLIs? Weren't they used in the 80s? I agree with you a 💯 percent. They are outdated but a lot of old applications still use CLIs. The terminal/command prompt generally has more permissions and access compared to GUI applications by default(It's bad user experience to allow 100 permissions to run an app).
Why build CLIs with Node
The main advantage is the ecosystem of over 1 million packages we get with Node. Using these we can avoid boilerplate code and implement functionality easily.
Getting Started with CLIs
Before doing anything else, we need to create a package.json.
- Create an empty folder
- Run
npm initand quickly fill in the options.
Let's create our javascript file, I'm naming it cli.js. This is a common convention which is followed as the file immediately tells us about its function. I'm going to add a console.log('CLI') to our file so that we can know that everything is working.
We need to update the package.json to run our CLI. Add the bin property into the file.
"bin": {
  "hello-world": "cli.js"
}
The hello-world property is the command name we want to run and the cli.js is the filename. If you want to use another name or your file is stored in a different path, update it accordingly.
Let's install our NPM package. In your terminal/command prompt run the following -
npm i -g .
We all have come across npm install in the past. We add the -g flag so that NPM installs the package globally. The . tells NPM to install the package. NPM installs the file that is there in the main property of the package.json. If you have changed
Now we can run the command name we set earlier(hello-world) and our CLI should boot up.
hello
However, we get the following error -
The error seems to tell us that compiler is not able to understand that we have javascript code. So, to tell the compiler that it should use node to run our file. For this, we use a shebang. Add the following code at the top of your file.
#!/usr/bin/env node
This is the path to node. We tell *nix systems that the interpreter of our file should be at the specified path. IN windows, this line will be be ignored as it is specified as a comment but NPM will pick it up when the package is being installed.
There we go, now it should work.
We have not actually done anything in our CLI except logging some data. Let's begin by implementing common features in CLIs.
Prompts
Prompts are questions that are asked to the user. You might have come across it in Javascript by calling the prompt function. I'm going to be using the prompts package. This package simplifies allows us to prompt the user and get the response with just a few lines of code.
Install it by running -
npm i prompts
Next, add the following code into your file and we will walkthrough it together.
const prompts = require('prompts');

// IIFE for using async functions
(async () => {
  const response = await prompts({
    type: 'number',
    name: 'value',
    message: 'Enter your name',
  });

  console.log(response.value); // the name the user entered.
})();
Note: IIFE's are function expressions that are immediately called. It shortens saving the function expression to a variable and the calling it.
Our basic CLI should look like this -
Awesome right? I think the terminal looks a bit dull, let's colour it up!
Colours with Chalk
Do you know how colours are added into terminals? ANSI escape codes are used for this(sounds like a code for a prison). If you've ever tried to read binary, reading ANSI is quite similar.
Thankfully, there are packages that help us with this. I'm going to use chalk for the purpose of this tutorial.
Install it by running -
npm i chalk
Let's get started by replacing the original console.log() with the following.
console.log(chalk.bgCyan.white(`Hello ${response.value}`));
console.log(chalk.bgYellowBright.black(`Welcome to "Hello World with CLIs"`));
As you can see, the first log chains the bgCyan and the white methods. Check the official documentation to know more.
After this, our code looks like this -
const response = await prompts({
  type: 'text',
    name: 'value',
    message: 'What is your name?',
});

console.log(chalk.bgCyan.white(`Hello ${response.value}`));
console.log(chalk.bgYellowBright.black(`Welcome to "Hello World with CLIs"`));
That's a good start, now let's bump up the font size. I can barely see anything.
Playing with Fonts
Changing fonts are quite difficult through javascript and I spent a lot of time searching for a package that does just that. Thankfully, I got it. We'll be using the cfonts package. Go ahead and install it by running the following -
npm i cfonts
Begin by replacing our previous console.log with the following -
CFonts.say(`Hello ${response.value}`, {
  font: 'tiny',
  colors: ['cyanBright'],
});

CFonts.say(`Welcome to Hello World with CLIs`, {
  font: 'simple',
  colors: ['cyanBright'],
});
Our Hello World CLI looks like this -
Let's add some basic arguments like -n or --name and -v or --version. We'll be using the yargs package to simplify the process. If you don't want to use it, you can use process.argv to access the arguments.
Begin by installing the yargs package.
npm i yargs
Let's import it into our code -
const yargs = require('yargs/yargs');
const { hideBin } = require('yargs/helpers');
const argv = yargs(hideBin(process.argv)).argv;
The argv stands for all the arguments specified by the user. We use the hideBin() method to remove the -- in front of arguments. Example -
hideBin('--example'); // output -> example
Now we can add a series of IF and ELSEIF checks for the arguments provided. You can also use a Switch statement.
const packageJson = require('./package.json');

if (argv.version || argv.v) {
    console.log(packageJson.version);
} else if (argv.name || argv.n) {
    console.log(packageJson.name);
} else if (argv.init) {
  // Put our functionality of printing hello world, asking name etc.
} else {
  console.log('Please specify an argument/command');
}
Since package.json is essentially a javascript object, we can pull off the properties from it. yargs helpfully provides an object of the specified arguments. We can check if the required properties. There's also an else check to see if the user has not given any arguments. Now let me show you some other common features in CLIs.
Loaders
Asynchronous and time consuming operations are very common in CLIs. We don't want to leave the user thinking his computer has hung up. We'll use the ora package for loaders. Begin by installing ora -
npm i ora
Let's require the package and setup a simple loader -
const ora = require('ora');
const spinner = ora('Loading...').start();
This loader will run forever because we haven't stopped it. We don't have any code that takes a substantial amount of time(API requests, data processing etc), We'll use setTimeout() to simulate the end of loading.
const spinner = ora('Loading...').start();

setTimeout(() => {
    spinner.stop();

    (async () => {
        const response = await prompts({
            type: 'text',
            name: 'value',
            message: 'What is your name?',
        });

        CFonts.say(`Hello ${response.value}`, {
            font: 'tiny',
            colors: ['cyanBright'],
        });

        CFonts.say(`Welcome to Hello World with CLIs`, {
            font: 'simple',
            colors: ['cyanBright'],
        });
    })();
}, 1000);
I've put our IIFE function inside our setTimeout() so that it gets executed only after the loader finishes. Our loader runs for 2000 milliseconds or 2 seconds.
Let's do a quick refactor. We have a callback in our setTimeout() which can be made async. We can now remove the IIFE function.
setTimeout(async () => {
  spinner.stop();
  // Body of IIFE function goes here.

}, 2000);
There's a lot lot more to do with ora, check out the official docs to know more.
Lists
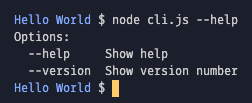
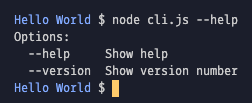
Remember the IF ELSEIF we had setup for arguments? Let's add a --help argument that lists out all the commands. Lists are a very important part of CLIs. I'm using a helpful package listr to handle these lists. Let's add the following code into our file in the place where we have our IF checks.
else if (argv.help) {
  const tasks = new Listr([
    {
      title: '--init: Start the CLI',
    },
    {
      title: '--name: Gives the name of the package',
    },
    {
      title: '--version: Gives the version of the package',
    },
    {
      title: '--help: Lists all available commands',
    },
  ]);

  tasks
    .run()
    .then(() => {
      console.log('Done');
    })
    .catch((error) => {
    console.log(error);
    });
}
We have created a new if check for --help. Inside that, we passed an array of tasks into the Listr class. THis will basically list the following. This can be done by console.log() but the reason I have used listr is because in each object in the tasks array, we can also specify a task property with an arrow function. Check out the documentation to know more.
Executing Commands from Code
A lot of CLIs will want to access other CLIs and run commands such as git init or npm install etc. I'm using the package execa for the purpose of this tutorial. Begin by installing the module.
npm i execa
Then, require the module at the top of the file.
const execa = require('execa');
In the ELSE block for our arguments condition, add the following code. If you remember, we already had a console.log() asking us to specify a command. Let's run our previous --help command and list out the available commands.
else {
  console.log('Please specify a command');

  const { stdout } = await execa('hello-world', ['--help']);
  console.log(stdout);
}
We call the execa() function and pass in the name of the command. Then, in an array we pass in the arguments to be provided. We will await this and then destructure the output. Then we will log the output to simulate running the command.
Our CLI should finally look like this -
That's it guys, thank you for reading this post. I hope you guys liked it. If you found the post useful or liked it, please follow me to get notified about new posts. If you have questions, ask them in the comments and I'll try my best to answer them. As a bonus, I have made a list of some packages that can be used while developing CLIs.
Helpful Packages
These are a list of packages that might help you while developing CLIs. Keep in mind that this is by no means an exhaustive list. There are over 1 million packages on NPM and it is impossible to cover them all.
Inputs
Coloured Responses/Output
Loaders
Boxes Around Output

Posted on March 5, 2021
Join Our Newsletter. No Spam, Only the good stuff.
Sign up to receive the latest update from our blog.


