Ajin Kabeer
Posted on February 29, 2020

My goal for the day is to get you started with XState library. XState will help us build finite state machines. First, we will build a state machine and then integrate it into a react app.
Excited already? let's get started.
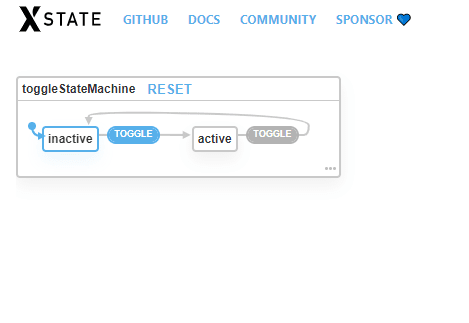
We will start with a very simple state machine called toggleStateMachine machine which will toggle between two states active and inactive.
Here's a cool visualizer for the state machine and how it transitions from one state to another.
Once you're in the visualizer page, empty the definitions tab because we are going to build it from scratch.
- Define a variable. This variable will be an instance of
Machine().
const toggleStateMachine = new Machine({})
- Now lets give an
idto this variable. We can even use the variable name for this.
const toggleStateMachine = new Machine({
id:'toggleStateMachine'
})
- Now we need to give an initial value to the state machine, as the name suggests it's the initial state of the machine when we spin it up. Since we are building a toggle machine, there will be two states
activeandinactive. So naturally, the initial state will be ininactivestate.
const toggleStateMachine = new Machine({
id:'toggleStateMachine',
initial:'inactive'
})
- Next, we will define all of the states this machine has.
statesis an object. We can add properties to its which are all the differentstatesthis machine can have.
const toggleStateMachine = new Machine({
  id: "toggleStateMachine",
  initial: "inactive",
  states: {
    inactive: {},
    active: {}
  }
});
- Click the
updatebutton. Voila!
- As you can see now, when the machine starts it will be in
inactivestate. So when an event happens theinactivestate should change intoactivestate. This is how you do it.
const toggleStateMachine = new Machine({
  id: "toggleStateMachine",
  initial: "inactive",
  states: {
    inactive: {
      on: {
        TOGGLE: "active"
      }
    },
    active: {}
  }
});
The on property tells the initial state which events it should listen for. Here, the on property tells the inactive state that it should listen to a TOGGLE event.
Similarly, the active property should listen to the TOGGLE event. So when the toggle is triggered while in the active state, it should switch back to the inactive state.
const toggleStateMachine = new Machine({
  id: "toggleStateMachine",
  initial: "inactive",
  states: {
    inactive: {
      on: {
        TOGGLE: "active"
      }
    },
    active: {
      on: {
        TOGGLE: "inactive"
      }
    }
  }
});
That's it folks!. Our state machine is ready to be integrated into a React application.
- Simple implementation using React Hooks.
import { useMachine } from '@xstate/react';

const toggleStateMachine = new Machine({
  id: "toggleStateMachine",
  initial: "inactive",
  states: {
    inactive: {
      on: {
        TOGGLE: "active"
      }
    },
    active: {
      on: {
        TOGGLE: "inactive"
      }
    }
  }
});

function Toggle() {
  const [current, send] = useMachine(toggleStateMachine);
  return (
    <button onClick={() => send('TOGGLE')}>
      {current.matches('inactive') ? 'Off' : 'On'}
    </button>
  );

}
Read More
Well, that's it, folks!. Thanks for reading. I encourage you to read more from the official XState documentation.

Posted on February 29, 2020
Join Our Newsletter. No Spam, Only the good stuff.
Sign up to receive the latest update from our blog.


