Embedded AI Learning Diary 2 |How to Run the MNIST Demo on the Embedded System?

Abby
Posted on July 30, 2020
This article will show you how to run the MNIST Demo (handwriting number recognition) on the RT-Thread opensource operating system to support your handwriting digital verification.
Preparation
- System: Windows | Ubuntu 18.04
- Board: STM32 H743ZI NUCLEO
- RT-Thread running environment
- MDK 5
- GitHub
The MNIST (Modified National Institute of Standards and Technology) is a large dataset of handwritten digits recognition.
This experiment will focus on MNIST, to further learning the mysterious connection between artificial intelligence and embedded.
This experiment is going to achieve:
Reproducing neural networks through the CMSIS NN library, importing int type weight files, then to successfully implementing MNIST inference in RT-Thread systems.
How to run MNIST on RT-Thread
- Pull
Mnist_CMSISorMnist_CMSIS.7zfromGitHubto local,Mnist_CMSIShas 520M, it is recommended to download the compression package with the only 66.4M. - Running options:
- Scons
- MDK5
- CMSIS and RT-Thread Inference Success Interface.
The CMSIS packages are already included on GitHub, download it and run, if you are generating a new project then you need to open the CMSIS package in the Menuconfig of RT-Thread.
1. PC Training Model
File: mnist.ipynb
1.1 PC Environment
- Tensorflow: 2.3.0-dev20200515
- Numpy: 1.16.4
- Keras: 2.2.4-tf
1.2 Data Set
File: ./data/mnist.npz
The MNIST dataset consists of 60000 (Training Set) and 10000 (Test Set) handwritten characters, the size of each picture is 28*28, here’s the address to download the dataset: http://yann.lecun.com/exdb/mnist/.
1.3 Network Structure
Two layers of convolution plus one full layer of connection.
1.4 Training Model & Verification Model
File: ./model/mnist.h5
- Training Model
1# save weights
 2model.save_weights(model_path / 'model_weights.h5')
 3
 4# load weights
 5model.load_weights(model_path / 'model_weights.h5')
 6
 7model.compile(optimizer='adam',
 8             loss='sparse_categorical_crossentropy',
 9             metrics=['accuracy',])
10loss, acc = model.evaluate(x_test, y_test)
11print("Restored model, accuracy: {:5.2f}%".format(100*acc))
1 313/313 [==============================] - 1s 2ms/step - loss: 0.1226 - accuracy: 0.9651
2 Restored model, accuracy: 96.51%
At this point. The model has been trained, but the preparation is not finished yet. Let’s keep going.
1.5 Others
Our ultimate goal is to have the trained Model to successfully reasoning (test) on the RT-Thread system.
The method used in this experiment is CMISIS + RT-Thread the taken steps are as follows:
- Change weight data to
inttype and saved. - Using the
CMSIS NNlibrary to reproduce the neural network, the file is a.cclass file. - Import weight files and test samples.
- Reasoning success.
2. Choose CMSIS Software Package
Note: Install the running environment required by RT-Thread
1# windows
 2> pkgs --upgrade
 3# Enable CMSIS
 4> menuconfig
 5> pkgs --update
 6> scons --target=mdk5
 7
 8# linux
 9# Enable failed, pelase execute
10# (base) Mnist_CMSIS[master*] % source ~/.env/env.sh
11(base) Mnist_CMSIS[master] % pkgs --upgrade
12(base) Mnist_CMSIS[master] % scons --menuconfig
13(base) Mnist_CMSIS[master*] % pkgs --update
3. Build the Network Structure by Using the CMSIS Package
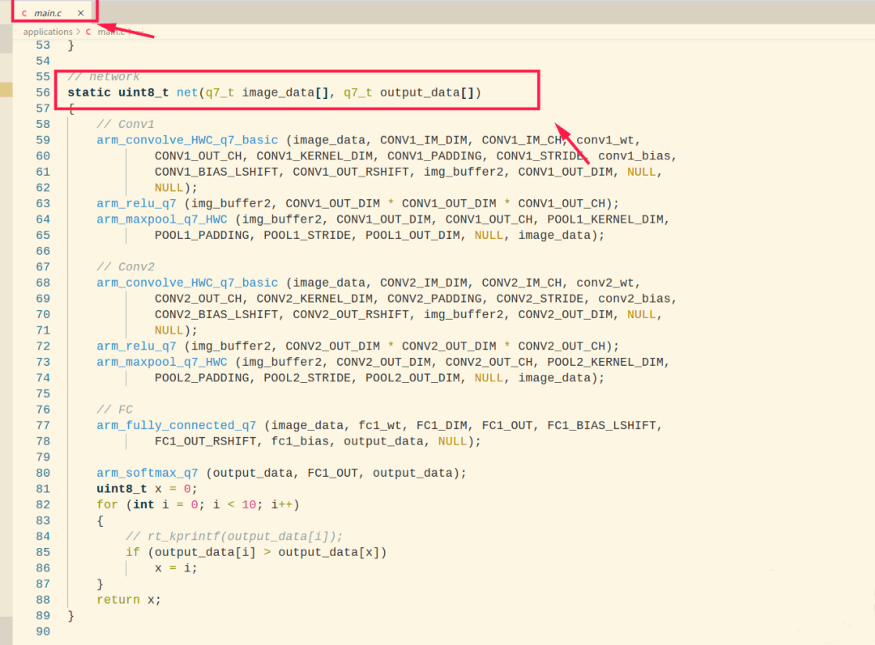
By calling the CMSIS API to build the network structure, this step requires a certain depth of background knowledge.

In addition, in the process of refactoring, the int type is used instead of the float type.
The way the data is passed in this project is a basic approach, with only an array of 784 sizes defined in the main.c file, and a handwritten digital picture of a size of 28 x 28, in an Int-type format. The code that reads the picture data specifically is implemented in mnist.ipynb.
As the input is a simple 28x28 x 784 (one-dimensional) array so the custom handwriting digital recognition verification can be supported here. It is recommended to start with custom handwriting digital recognition verification in mnist.ipynb.
The saved picture of the custom handwritten number is as similar as the picture in the training set, if the saved picture is not in a size of 28 x 28, you can refer to the code in mnist.ipynb, change its Resize into 28 x 28 and make sure that the one-dimensional array of input has a size of 784, consistent with the network input.
You can read the source file for more information, other files stay the same.
- ./Mnist_CMSIS/applications/main.c.
- ./Mnist_CMSIS/applications/mnist_parameters.h.
4. Compile and Burn
Windows (Recommend to use MDK)
By clicking only one key, MDK compiles the whole project and downloads the generated binary file to the board. Users could observe the output messages through Putty or other serial-port tools.Linux (Recommend to use Scons)
Compile all the source code by invokingscons, download the executable file to the board throughSTM32 Cube Programmerand observe the output throughminicom.
Success Interface
5. FAQ
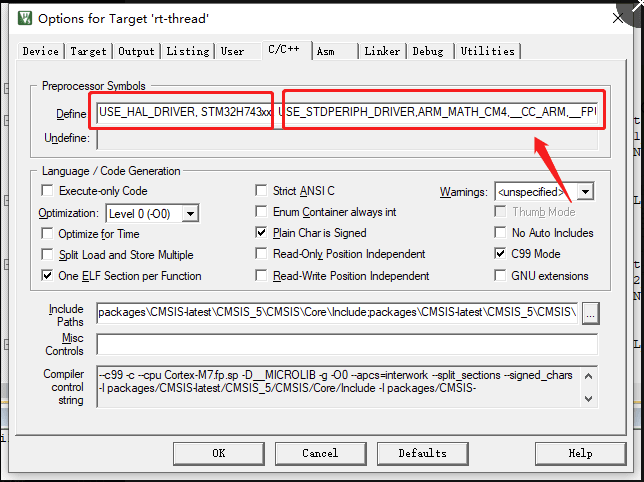
5.1 CMSIS + RT-Thread can’t find arm_math.h
Solution:
2、Add Macro Definition
USE_STDPERIPH_DRIVER,ARM_MATH_CM4,CC_ARM,FPU_PRESENT, ARM_MATH_DSP
- linux:
- In
./Mnist_CMSIS/packages/CMSIS-latest/SConscript, line 15, manually addDSP, add:CPPPATH = CPPPATH + [cwd + ‘/CMSIS_5/CMSIS/DSP/Include’]
After Scons will then report such an error:
Solution:
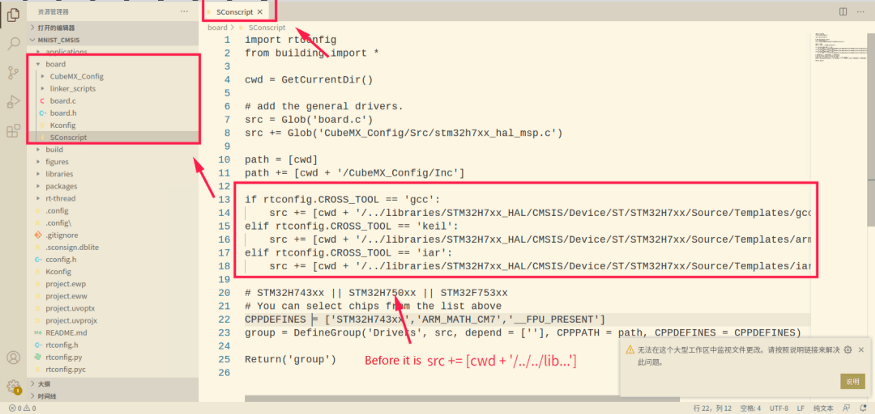
In ./Mnist_CMSIS/board/SConscript , line 22, change it into:
CPPDEFINES = [‘STM32H743xx’,’ARM_MATH_CM7',’__FPU_PRESENT’]
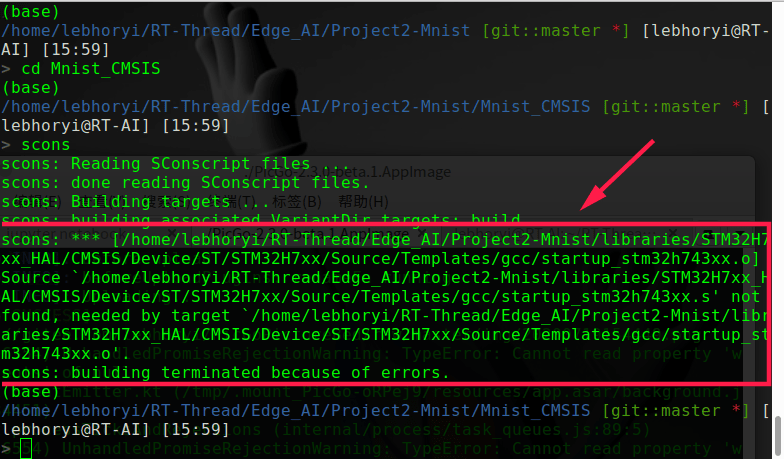
5.2 Scons Reports an Error
Solution:
In ./Mnist_CMSIS/SConscript, change it as follows:
RT-Thread Contact Info:

Posted on July 30, 2020
Join Our Newsletter. No Spam, Only the good stuff.
Sign up to receive the latest update from our blog.
Related

November 30, 2024
November 30, 2024


